
It's so cold here in New England, despite it being May 19th, so thoughts turn to making the house warm and lightly scented. What better than bread? Now, we have a KitchenAid mixer, so kneading isn't really a concern. However, sometimes it's nice to not really have to work for your bread. With this in mind, I present to you a recipe I got from the New York Times, for No-Knead Bread. You can set this up at night, and bake it when you come home from work the next day.
3 cups flour (bread or all-purpose)
1/4 t instant yeast
1.25t salt (I think it needs more--use your judgement)
Combine above in a bowl. Add 1 5/8 C water and stir. Cover with plastic wrap and let rest 12-18 hours. Fold the dough over on itself a couple of times on a cutting board and allow to rest 15'. Shape the dough into a ball, and dust with cornmeal. Cover with a towel, place on another towel, and allow to rise 2 hours. While it rises, place an oven-safe pan with a lid into a cold oven, and preheat to 450. CAREFULLY remove the pot from the oven, place the dough inside, and shake the pan to evenly distribute the dough. Cover and bake 30', then remove the lid and finish baking 15-30'--bread is done when it's a lovely brown.
The thing I really like about this method is the wonderful crispy crust you get. This bread also made wonderful stuffing a couple days after baking. It is really sticky in the towel phase, so be sure to use lots of flour or cornmeal--I would recommend a 1/3 flour 2/3 cornmeal mix, to prevent your final loaf from being insanely floury on the outside. Enjoy the minimal effort/maximal reward feeling when you eat!
Saturday, May 19, 2007
Making Bread

Thursday, December 21, 2006
The Usefulness of Rachael Ray, and other Snowbound Thoughts
Okay, so I'm moving this weekend and I just got hit by Denver's "Blizzard of 2006." This creates two (culinary) problems: All my dishes are packed and all my food is at it's bare minimum, and I can't go out and buy anything as all the supermarkets have been closed down.
Last night we had a little less than a half chicken breast and some assorted foods, and we wanted to make some warm soup to get through the night. We really didn't have enough broth, but we have a fridge full of wine from a going-away party earlier in the week, so I thought I could make a tasty liquid. As I'm cooking I realize that I have a can of crushed tomatoes, and I realized that I'm saved. Yes, saved.
While watching her show makes me want to die, Rachael Ray usually has some recipes that can be easily changed to fit your situation so that you, too, can have a tasty meal with some pantry staples (and really, we're down to just the pantry duct tape at this point!).
So, one of our favorite Rachael Ray recipes is her *sigh* Italian Sub Stoup. We had recently altered the recipe to make an Italian sausage stoup for an appetizer party, so I decided to save the day and make a delicious concoction that I probably wouldn't have thought of without her.
I took the 3/4 of a box of broth, juice-box sized box of stock, some leftover wine, and the crushed tomatoes to create a hearty base. I then added some cooked chicken, two carrots, garlic, half an onion, and bit of green pepper to create a "stoup." We added the last of our croutons and parmesan cheese and had a delightful and healthy meal (when our alternative was about 1000 crackers). It's not so much Rachael Ray's exact recipes, but really her methods that will come in handy in a pinch.
But please, do yourself a favor and DON'T watch her talk show.
Sunday, December 17, 2006
Cranberry-ginger and orange pinwheels

These are the cookies that I made for the cookie swap I hosted this evening (it went smashingly). They turned out very well, but I'm not sure I'd make them again - I always find the rolling and cutting process pretty tedious!
Dough:
1/2 c. butter
1 1/2 c. sugar
1 tsp. orange rind
2 eggs
1/4+ tsp. cinnamon
1/4+ tsp. nutmeg
3 c. flour
1/2 tsp. baking powder
1/2 tsp. salt
Filling:
1 c. cranberries
1 c. pecans
4 medallions of candied ginger, chopped finely
1/4 c. brown sugar
Cream together the butter and the sugar until it becomes very light in color (signifying that it has become aerated), about 5 minutes. Add the orange rind and eggs (one at a time please!), then the spices, baking powder and salt. Mix until very well combined. Blend in the flour a cup at a time - if you have a stand mixer, it will probably be able to handle this fine, but if you're using a hand mixer you may need to get in there with your hands to combine the last half cup or so. Divide the dough into two portions and put it in the fridge for at least an hour (we chilled ours overnight).
While the dough is chilling, prepare the filling (hey, that rhymed!). If you have a food processor, just throw all the ingredients in there and process until it's all chopped up. If not, mix everything together in a bowl and use your blender to do it in two or three batches.
Roll out one half of the dough into a 1/4" thick rectangle (about 10"-12" on the long side) on top of a piece of parchment paper or a flexible cutting board. Spread half of the filling on the dough, leaving an inch of dough on each long side and one of the short sides. Then, using the parchment paper, roll up the dough starting at the spread short side. Pinch off the ends and roll the dough in a sheet of plastic wrap, then pop it back in the oven, this time for at least four hours (!)
Once the dough has chilled - it should be super firm at this point - use a sharp knife to slice into 1/4" cookies. You should try to rotate the roll after every few cuts so you don't smush it on one side. Bake 8-15 minutes (depending on thickness) at 375°F.
And just for fun, here's the rest of the spread, post-party:
Dee-lish!
Monday, November 13, 2006
Talking Turkey
Okay, so it's coming. One of the biggest eating holidays of the year. And the centerpiece is usually turkey. Turkey can be a tricky thing. It seems like you could cook birds of the same size for the same time and one will be dry, and the other raw. It can be tasty, but sometimes can be flavorless (a particular complaint of dry turkey). It seems confusing, no? Well, never fear, because here is a complete, easily adaptable, countless variations turkey recipe guaranteed to come out right every time. Unless your oven breaks, then I can't help you.
You will need:
A good quality roasting pan. I own this one , but any good heavy one will do.
A meat thermometer with an alert. There are lots of good ones out there.
A turkey of a size appropriate to your gathering, fresh and not frozen please!! My family gathering of 7 will happily cook a 20lb turkey, because sandwiches on Thanksgiving night is more required than tradition. All that lazing around makes you want leftovers!
Carrots, onions, and celery, 2 of each is good
chicken broth (or turkey broth, or veggie--whatever you like), 2 32oz. boxes or so.
Butter. Yes, it has to be butter. Trust me. I would recommend using a whole stick, because if you don't use the leftovers for gravy, it will taste amazing on bread.
Herbs of your choice, fresh or dried is not terribly important. These will be mixed with the butter.
About an hour before you cook, take the turkey out of the fridge. Wash it inside and out, pat it dry inside and out, and salt and pepper it. Place it on the roasting rack in the pan, and let it sit at RT for an hour. Use this hour to preheat the oven to 450. About 30' beforehand, soften some butter, and mix into the butter whatever herbs you'd like to flavor your bird with. I like using fresh thyme, or a mix of rosemary, thyme and garlic. If you are using fresh and NOT stuffing the turkey, place some sprigs of herb in the cavity. Carefully (VERY carefully) slide your hands in between the skin and breast of the bird, and loosen the skin. Generously rub the herb butter over the breast meat. Leaving pieces is OK, just don't shove chunks in and leave it. You want to get all the meat. This will take 4-6T of butter total, depending on bird size. Put a little butter on the skin of the bird if you like crispy skin; if not, leave it. Cut up your veggies, and scatter them in the roasting pan. Add enough broth just to cover the veggies; I would use about a box and a half of broth for my roasting pan, but once again, this is dependent on size.
Now, insert the meat thermometer into the thickest part of the thigh, but DON'T TOUCH THE BONE (that is so important--ask me how I know). Try going parallel to the bone. Guidlelines say that the bird is DONE when the leg reaches 185 degrees, so you want to set your thermometer to go off when the meat reaches 175 degrees. Yes, you heard correctly. We'll get to this.
By now your oven should be fully preheated. Open it, and slide the bird in. Make sure (before you do the sliding) that your only rack in there is in the bottom 1/3 of the oven. Cook at 450 for 30'. After 30', turn the oven down to 350, and cook until the temperature alarm goes off. As a time estimate, an unstuffed bird takes about 12-15' per pound, and a stuffed one takes 18-22' a pound. This is also dependent on your oven--my mom's pretty shiny new oven cooked the turkey an hour faster than predicted. So time is an estimate only! Do not open the oven to baste the bird--this only lets heat out and makes the skin soggy. Only open the oven for two reasons: 1) the pan is getting dry and you need to add more broth, or 2) the turkey is browning faster than you like, so you need to tent it with tinfoil. NO BASTING!!
Once you take the bird out, pick up the rack and move it to a plate. Turn the alarm feature off of the temperature probe, and cover the turkey with foil. The temp should continue to rise for the next 30' or so, thus ensuring the cook point of 185 degrees, but not making dry turkey!
Okay, you are now ignoring the turkey. Take the roasting pan, and pour the liquid inside into a measuring cup, or (even better) a fat separator. Let it sit for 5'. Melt some butter into a large saucepan (leftover herb butter, anyone?) and throw in some fat from the liquid in the measuring cup. Add enough flour to make a paste, and stir for 1' over medium heat. When it's thick enough, add the pan liquid (and extra chicken broth if needed/desired) into the pan. Stir or whisk for 1'. Bring to a boil, and boil until the gravy coats a spoon (meaning, it gets thick). If it's thicker than you like, just whisk in a little more broth.
When the gravy is how you want it, take it off the heat. Carve your bird as desired, and serve with the hot gravy. Oh so very good!!
Gravy variation which sound weird but is so very good:
Instead of making the butter/fat/flour roux, put some gingersnap cookie dough into the pan. Add a little broth and fat, and whisk till it's smooth. Add broth as desired. This works well with turkey seasoned with thyme and/or garlic.
Saturday, November 11, 2006
Curried pumpkin soup / how to break down a pumpkin

The pumpkin that we never got around to carving on Halloween needed to be dealt with. I originally wanted to break it down into chunks, but that wasn't going to work - the skin was impossible to peel and the shell was too hard to cut it into wedges and "peel" with a knife. I managed to crack it in half and scoop out the seeds,* then put both halves on a cookie sheet in a 450°F oven for about an hour (it was a big pumpkin). Once the flesh was fork tender, I took it out and let it cool.
* I set the seeds aside to dry, coated them in kosher salt, and then toasted them in the warm oven after the pumpkin itself was done baking. They make a great little snack... if you're feeling adventurous, try adding some other spices to the mix - paprika, curry powder, cayenne pepper or even just a little black pepper would be tasty.
When I went to go break it down, I discovered that it was pretty stringy - not surprising since it was so big. So I broke out the trusty food processor (you could use a blender to do this) and processed it in three or four batches. I ended up with a smooth, if watery, pureé, similar to what you would get out of a can.
So, what does one do with eight cups of pumpkin puree? Make a soup, of course. Pumpkin curries are one of my favorite Thai dishes, and I keep stumbling across really delicous-sounding recipes for pumpkin with curry (or curry-like flavors), so I decided to make an attempt at my own combination. I am happy to say that it came out really well. The pumpkin is pretty mild, but I think the flavor comes through the coconut milk and curry. The lime and cilantro add depth, but they aren't 100% essential.
This made a pretty big recipe (6-8 servings); you can certainly cut it in half.
Curried pumpkin soup
1/4 c. olive oil
2 onions, diced fine
1 tsp. salt
6 Tbsp. curry paste
1 Tbsp. grated fresh ginger (or 1 1/2 tsp. powdered)
2 c. (16 oz) vegetable broth
5 cups pumpkin puree (equivalent to about 2 x 15.5 oz cans)
1/4 c. brown sugar
1 x 13.5 oz can coconut milk (optionally - set aside 1 Tbsp or so to drizzle on top of each bowl)
(optional) lime juice, cilantro
Directions:
In a dutch oven or similarly large pan, warm olive oil over medium heat. Add the diced onions and salt and cook until onions are translucent, about 10 minutes (since there are so many of them). Add the curry paste and fresh ginger and stir well. Cook another 2 minutes, just to get the flavors all out of the curry paste. Add the vegetable broth, pumpkin puree, brown sugar and coconut milk and stir well. Bring to a boil, then simmer 10 minutes.
If you want a super smooth texture, run the soup through your food processor or blender 1-2 c. at a time (just don't fill your blender more than halfway full, or you may end up cleaning the soup off your ceiling). I decided that the texture of the onion pieces wouldn't bug me enough to justify breaking out the blender again, so I skipped this step.
Just prior to serving, squeeze the juice of 1/4 lime over each bowl; top with 1-2 tsp. chopped fresh cilantro.
---------
As for the rest of the pumpkin, it will probably get made into this Pumpkin Pecan Coffee Cake from Once Upon a Feast for breakfast tomorrow. :)
Thursday, July 06, 2006
Beyond a Plain Burrito
I am back from my post-qualifying exam, and thinking about food again! What better way to celebrate than making yummy burritos??
Now, my boyfriend is a simple man, and likes meat and cheese and salsa on his. But it pays to be slightly more creative! So here's my basic recipe, and then lots of yummy yummy add ins!
Ground beef (however much you need--easily adaptable to a large group). Now, you can use what you like, but I cannot recommned using 85% lean or less enough. If the meat is too lean, it gets dry. We usually use ground beef from a local butcher that comes to our farmer's market. If you have this option, I strongly recommend it!
Heat a skillet over medium high heat. Put the beef in and break it up with a wooden spoon. Season with salt, pepper, and garlic powder (not cloves--they may burn and taste nasty). Saute meat until done (no longer pink).
Once the meat is done, wrap burrito tortillas (I use Mission falls soft taco size, but use what you like) in a damp paper towel and microwave according to package directions. This will warm and soften them.
After you do this, take cheese, salsa, and sour cream out. Now I like mild cheese, and I have a microplane grater, so I just grate the cheese directly onto the meat in the burrito. But pre-grating is good too.
Place meat on tortilla. Top with cheese, sour cream, and salsa. Wrap as desired (I'm a disastrous mess at this part). YUM!
Now for add-ins:
after sauteeing meat, try sauteeing some squash or zucchini and adding it. For a vegetarian meal, saute the squash with some corn or carrots. Add cauliflower or broccoli. These make excellent burritos! Just pick a veggie that is still a little crunchy after cooking, and you're good to go! I usually go for whatever I can find at the market on Thursdays. Oh, and if you roast corn according to the previous entry, just scrape that off the cob and voila! the perfect add in!
Heat some refried beans and use those with the meat for a protein filled meal.
Cook some chicken any way you like--shred it into pieces (use a fork to hold it down, and scrape another fork over it to pull pieces off). This also works with turkey and pork.
Just remember, a quick and easy and delicious burrito isn't too much work!! Think outside the wrap and make your own delicious variations!
Tuesday, July 04, 2006
Roasted Corn, other corn methods
Since corn is in season and it's the Fourth of July, I thought I should share my new discovery about corn. My old corn cooking method was from David Rosengarten (from The Television Food Network's Taste show). For that, you put cold water in a pot, add corn, put on high, and the corn's done when it comes to a boil (living in high altitude, however, I had to alter that a bit to "boil for a few minutes").
Recently I saw an episode of TVFN's Tyler's Ultimate (with the very attractive Tyler Florence!) for Roasted Corn with Chili Lime Butter, and just had to try it.
6 ears fresh corn, unhusked since it's just me and my fiance, we usually do two, maybe three ears
1/4 pound butter (1 stick), room temperature two tablespoons-ish
2 teaspoons chili powder to taste
1 lime, zested mmmm...limey
1 lime, cut into wedges I usually forsake this for this recipe as it's limey enough and just for garnish
Preheat oven to 350 degrees F.
Place the corn in its husks directly on the oven rack and roast until the corn is soft when you press on it, 30 to 40 minutes.
While the corn is roasting, combine the butter with the chili powder and lime zest.
Peel down the husks and tie in a knot to use as a handle while eating. Fiance does this as he used to work at a restaurant and doesn't have my wussy hands Rub the corn with soft butter mixture, and garnish with a lime wedge. (This roasting method produces the sweetest corn I have ever tasted.) This is actually part of the recipe, but I agree
In similar fashion, fiance grilled corn last week at his family vacation (we don't own a grill, it's very sad!). His mother peeled the husk down banana-style, took out the silks, retied the husk back on (usually done with string, but she improvised by tying with some husk-strings), then let them soak. I believe she said "two hours," but we didn't have the time. Fiance then put them on a medium grill (or he should have as lots of fire was involved) until soft when you press them. Fiance's five-year-old nieces weren't impressed by the "burnt corn," but it tasted delicious to me! Just be careful of the flames, cook them at the highest over a medium flame, and soak them for at least two hours and it should be delicious.
Monday, June 26, 2006
Guide: Choosing the Right Cooking Oil
Like many people, I grew up with an old-school mother. We fried with vegetable oil, buttered our bread quite liberally, and baked with Crisco. I'm sure by the age of 10, my arteries started to clog.
After graduating college, I decided that my diet needed to consist of something better than beer and buffalo wings, so I started cooking healthier for myself.
Being a sci-geek, I knew from all the research that olive oil was supposedly "the best," in terms of health benefits. It is lower in saturated fat than most of the other oils, and is a staple in the widely-regarded "Mediterranean Diet."
I started cooking with olive oil. I started cooking everything with olive oil. It was going swimmingly, until I decided to bake with it. Let's just say that I ended up throwing out that batch of muffins. . .
I tried a commercial non-fat cooking spray. I now have an entire set of cookware I can't use because PAM stripped the Teflon of it's non-stick capabilities. While I continue to use this stuff for baking, I will never, ever use it for stove top cooking again!
I've become more sophisticated with oils now that, a) I know there are other healthy oils out there, and b) that each oil has a specific purpose- there is no one-size-fits-all solution.
While none of these "rules" are hard and fast, it's a general guide to help decide which oil is right for your needs:
Deep-frying: For deep-frying, a high-heat oil is necessary. The best healthy oils for this are Peanut and Safflower. Both have a non-invasive flavor that won't linger on your food, but it is wise to be careful when serving food with peanut oil, as there is an increasing number of people with food allergies.
Pan frying/sauteeing: Any number of oils can be good for pan frying or sauteeing, depending on what flavors you'd like to achieve. For a stir-fry, I generally like to use canola oil, with a dash of toasted sesame oil for flavor (you get a lot of bang for your buck with this stuff- less is better). Canola oil is another oil that doesn't flavor food prohibitively, so I like to use it as an all-purpose oil. I tend to use pure or virgin olive oil strictly for Italian cooking, or to add flavor to a bland piece of protein, such as Tilapia.
Baking: It's clear that butter, lard, and shortening give the best flavor in baking. However, my waistline is more important to me, so I use canola or safflower oil on the rare occasions that I bake. Peanut oil is another good option, but can be difficult to use if someone has peanut allergies.
I've also done the popular subsitution of applesauce-for-vegetable oil in some recipes. It works for some, but not for others.
Other: Of course, I use extra-virgin olive oil for drizzling or dipping bread. I've also used orange oil for it's cleaning properties, as it is now a popular additive for commercial cleaners. Flaxseed oil has also become a popular supplement among athletes intent on consuming essential fatty acids, like Omega-3's, and fiber (or as a cop-out among steroid users. . .)
It's easy to overlook the importance of oil in cooking. Not only does it help to add flavor and texture to food, but it also helps add essential fat to the diet. There are lots of vegetable-based oils out there that are healthy and add interest to food.
Besides my own personal opinions, there are some guides out there, that discuss the benefits and drawbacks for each type of oil. Many give details on the types of fats they contain and what their best uses are. The only way to figure out what works best for you is to explore and experiment!
Tuesday, June 20, 2006
Coming of ade
To close out my personal mission to find recipes for every fruit and veggie that is perfectly in season this month, I tried a very simple recipe: Limeade, based on this lemonade recipe from "Simply Recipes". Apparently, the trick to a perfect cold beverage is to use heat! [Cooking for Engineers concurs.]

While the sugar syrup is boiling and cooling, juice your limes. You will need 1 c. lime juice altogether, which for me was 8 limes worth. Each fruit gives about 2 Tbsp. juice by normal squeezing, but if you have a good citrus juicer you might get better mileage. I also strained the lime juice to avoid getting pulp and/or seeds in my drink.
Mix together the syrup, lime juice and another 2-6 c. cold water/ice, depending on how sweet you like it, and serve. For the record, we added about 4 cups water, and enough ice to fill our glasses. Makes 6-8 servings.
Monday, June 19, 2006
Quick and easy stir fry
To celebrate the arrival of my new Calphalon wok on mail order (hey, it was $40; I couldn’t say no), I had to make some stir fry!
My husband is a reformed picky eater, and stir fry was really the first thing that I could ever get him to really eat that wasn’t pizza or macaroni and cheese. He never cooked for himself and rarely ate out healthy, so I think it was just that he didn’t know what he liked. One night, I cooked him a basic, quick stir fry. He liked it so much that it has become one of our quick, tasty weeknight meals. And it’s so easy that he can even cook it himself!
I don’t have a hard and fast recipe that I follow, and I generally use what I have on hand. Sometimes items get included and sometimes they don’t. I usually make this with chicken, though lean pork chops have been used more than once. I haven’t used beef with it, but I assume it is good as well.
Ingredients:
1-1.5 lbs boneless skinless chicken breast - use your favorite meat or meat substitute - cut into strips and/or cubed
1 red bell pepper, sliced into strips and halved
1 green bell pepper, sliced into strips and halved
2c broccoli florets
1c matchstick carrots - you can shred your own, but already shredded ones saves time
1c sliced mushrooms
1c snow peas - sugar snap peas can also be used here- I usually buy what’s in season and cheapest!
½ onion, sliced into ¼-inch wide strips - I usually use yellow or Vidalia onions
1 can sliced water chestnuts, drained
1 can bamboo shoots, drained
¼-1/3c teriyaki sauce of choice, to taste - Since Kikoman is the best, that is what I usually use. I like the roasted garlic flavor, and if I'm using regular teriyaki, I tend to add a clove of minced garlic to elicit that flavor
1T canola oil
1 tsp toasted sesame oil
Heat the canola and sesame oil in a wok over high heat (if you don’t have a wok, you can also use a sautee pan. A decent starter wok can be found at IKEA for $10). Brown the chicken in the oil, add about half the teriyaki sauce, and reduce heat. Add sliced vegetables, beginning with the broccoli, onions, water chestnuts, and bamboo (the water chestnuts and bamboo will add moisture and will keep things from sticking)- these tend to take longer to cook. Add in the remaining veggies and remaining teriyaki sauce when the onions are translucent. Cover wok with large lid, so contents steam and cook for about 5-10 more minutes.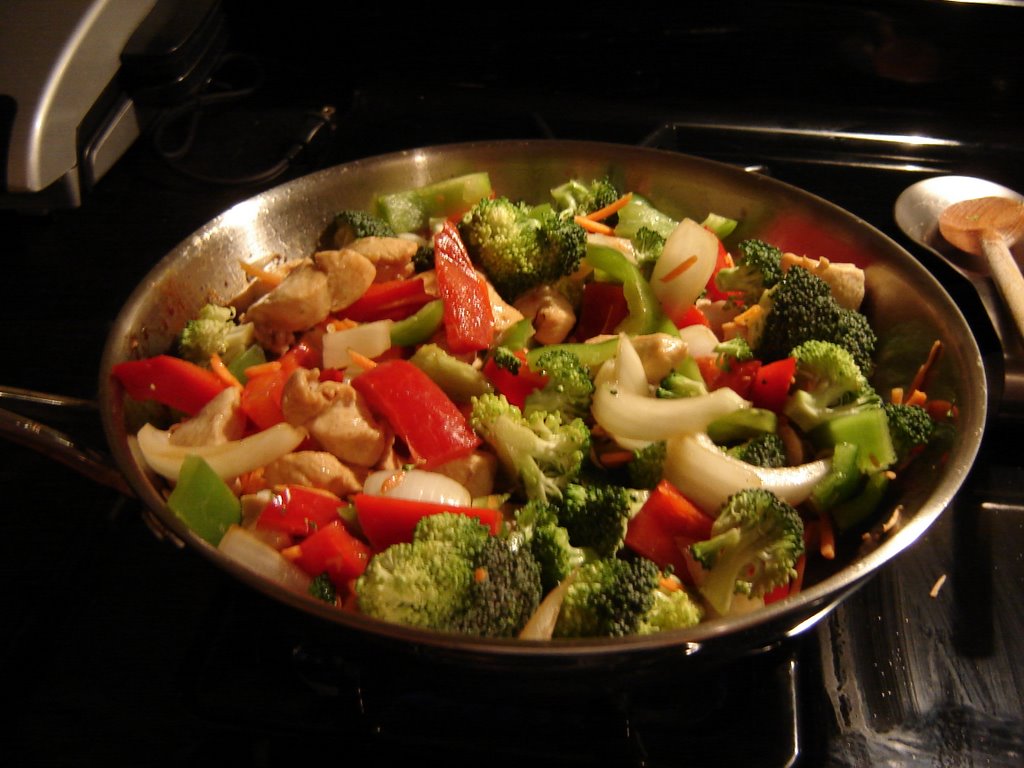
Serve over rice (I usually use organic brown instant rice, in a pinch, but “real” rice and long grain white rice can also be used!) Add soy sauce to taste.
Filed under: recipes, stirfry, techniques, vegetables, wok, chicken
Saturday, June 17, 2006
Technique: How to slice an onion (and a cantaloupe)
Knowing how to cut various fruits and vegetables quickly and with little mess/fuss/waste is a great life skill to have, and essential if you want to cook often. So, here's the first in a series of photo posts on how to cut stuff up [clicking on the pictures will take you to a larger version].
Note that I'm not talking specifically about "knife skills" because mine are horrible (please don't copy my hand position), but more of a "how to approach vegetable/fruit X" sort of thing.
Today I'm doing two: starting off with the onion, because nearly every recipe I make has onion in it somewhere, and then doing a cantaloupe, because I happened to buy one today.
( Read more... ) The halves should look like this when you're done:
Remove the papery outer layers of the onion at this point. Now, cut each half into small wedges, but don't cut all the way through to the root. Leaving a little space between the cut and the root will hold the onion together while you're cutting and make your life much easier.
If you want larger wedges of onion, for a curry or stir fry or something, cut the root end off now. Otherwise...
Cut across the onion as in the pictures. You can vary the size of the cut as appropriate; this particular onion went into some delicious salsa.
Next up: cantaloupe. Since melons are supposedly very much in season, we picked one up at our grocery store today. I eat most fruit raw, so I just cut the cantaloupe into chunks.
The first step is to cut the melon in half, starting at the 'bellybutton' at the top. Then, using a sharp-edged scooping device (like a measuring tablespoon or an ice cream scoop), remove the seeds. Next, cut the cantaloupe into wedges - I find it helps to tilt the melon a bit so you don't have to hold the knife at too much of an angle.
Once you have all your wedges, cut notches into the flesh of each one - down to the rind but not through it. This lets you sort of spread the wedge flat. Now, slide your knife along the rind, and voila! Perfect chunks of cantaloupe.
You can, of course, skip this step if you like the wedges.
I have to say, there's really something to this 'peak season produce' thing. This was definitely one of the best cantaloupes I have ever had (tip for identifying a ripe melon - smell its bellybutton! If you are overwhelemed by melon scent, it's ready to go). I might have to go back tomorrow to get another; perhaps a cold soup is in order? It's been friggin HOT here lately.


Thursday, June 15, 2006
Beyond the Basics: Chicken
Okay, everyone loves chicken, but it can get boring, right? Well, this is my answer to boring chicken.
2 quarts water
1 cup salt
2-4 bone-in skin-on chicken breasts
pepper to taste
I know, doesn't look like much, does it?
Dissolve the salt in the water. Put the chicken in the water, and refrigerate for 30'-1 hour. If you want to do longer, that is fine, but cut down on the salt in the brine by about half (if you're going to do over 2 hours). Rinse the chicken with fresh water, pat dry, and season with pepper.
Preheat the oven to 450.
Heat an oven-safe skillet with a small amount of oil over high heat. When the pan is screaming hot, place the chicken skin side down in the skillet. Cook for 5', until chicken is brown. Turn the chicken over and brown the other side, about 4'. Turn the chicken skin side down again, and slide the pan into the oven. Cook for 18-22 minutes. It's easiest to slide a remote meat thermometer in and set it to go off when the chicken hits 160. Let the chicken rest for 10'. While it is resting, you can cook some shallots (or whatever you like in gravy) in the pan juice, add some flour and some chicken stock, and make a quick gravy. I usually serve this with just crusty rolls and some salad, anything green.
Enjoy!
This is really simple and adaptable, and turns out an incrediably moist and crispy chicken. You can serve it with almost any side dish you like. Plus, bone-in skin-on breasts are very cheap! As a note of warning, this recipe turns out more smoke than I've ever seen--everytime, with every pan I use. So be prepared to open some windows and turn off the smoke detector. But oh so yummy!
Wednesday, June 14, 2006
Eat your vegetables
As much as I love to cook, most of the time I get home from work and don't want to spend more than maybe half an hour on dinner. But I still want something that looks like a meal and is reasonably healthy. So dinner usually follows my 'rule of three' - (1) protein source [chicken, fish, tofu], (2) vegetable, (3) whole grain [brown rice, quinoa]. Sometimes I combine the three, like in a stir-fry over rice, but it looks so nice and wholesome and All-American Dinner-y when you prepare them separately.
I like to keep my veggies simple; if you buy good fresh produce, it doesn't need much help to taste good. Here are a few of my favorite easy sides:
Microwave steamed garlic broccoli
broccoli
1 clove garlic
salt and pepper*
Remove the peel from your clove of garlic, then mince and mash it. (To remove the peel, lay your knife blade flat on the clove and pound it with your fist a couple times. Mashing the garlic with your knife blade after mincing releases more flavor, but you don't have to do this.)
Cut up your broccoli heads into bite size pieces and stick them in the bowl with the garlic. Add 1-2 Tbs. water (depending on how much broccoli you're making; 1 Tbs. per cup of broccoli is good), a little salt and pepper, and cover with plastic wrap. Microwave 30 seconds on high. Stir and check doneness, microwave additional 10 seconds if it's still too stiff. Repeat until you reach the desired softness.
This method also works for kale, spinach, green beans...
[Note: I cannot emphasize enough how using freshly ground pepper will change your life. It's totally different from pepper shaker pepper. Seriously, go out and buy a $5 grinder. Right now.]
'Grilled' asparagus
asparagus
olive oil
salt and pepper
half a lemon or about 1/2 tsp. lemon juice
Cover a cookie sheet in tinfoil (this is optional, but it means you don't have to wash the cookie sheet when you're done). Spread a thin layer of olive oil over the sheet [I actually buy a spray can of olive oil from Trader Joe's, which is perfect for this purpose]. Snap the big ends off of the asparagus, and then lay the spears out on the tinfoil. Drizzle or spray with olive oil, sprinkle liberally with salt and freshly ground pepper. If you have half a lemon, slice it thinly and place the slices over the asparagus. If not, sprinkle a little lemon juice over them instead. Stick these under the broiler for about 5-10 minutes (when the tips start to get dry, they're done), and serve.
If broiling isn't your thing, you can cook them in a saucepan instead. Heat up the oil (or 1/2 Tbs of butter) on medium heat, put in the asparagus and lemon slices, sprinkle with salt and pepper, and cook 5-10 minutes until tender. This method ALSO is great for kale or green beans.
Glazed carrots
1/4 lb. carrots (2-3 medium)
1/2 Tbs. butter
1/4 c. ginger ale OR
1 Tbs. sugar + ~2 tsp. freshly grated ginger + 1/4 c. water
pinch salt
This is a bastardized version of Alton Brown's very good Ginger Ale glazed carrots - we made this recipe so often that we wanted a cheaper alternative to fancy and expensive ginger ale. Anyway.
Chop the carrots width-wise (into 'medallions'). Melt the butter in a saucepan over medium heat, add the carrots and ginger ale (or sugar/ginger/water). Cover and bring to a boil. Once boiling, stir and reduce heat, re-cover and let simmer 5 minutes.
Remove the lid and turn up the heat, cooking another 5 minutes (or until the liquid has boiled off) with occasional stirring/tossing. Salt and pepper to taste, of course, and serve ASAP. The ginger ale/ginger+sugar leaves a nice sweet glaze on the carrots.
