
Although I missed out getting on my own CSA farm share this year, one of my good friends got one and has been generous in handing over her beets to me. I love beets just plain, cool, sliced and sweet, but this week I wanted to make something with them. I turned to Mark Bittman, a.k.a. "The Minimalist", and found exactly the answer to my beet question: Beet Rösti with Rosemary. I wasn't familiar with rösti before reading this recipe, but upon learning that it is a Swiss potato pancake, I'd like to become better friends. Here is my very slight adaptation of Bittman's recipe:
5 medium/small beets, peeled
1 tsp fresh rosemary, chopped
salt & pepper
1/3 cup flour
2 TBS butter
3 TBS sour cream
2 tsp fresh horseradish
1. Grate the beets, either by hand or in a food processor. If you're grating by hand, wear an apron or clothes on which you wouldn't mind a purple stain. (I recommend the processor!)
2. Mix shredded beets with rosemary, S&P, and half the amount of flour. After incorporating, add the rest of the flour and toss. Bittman doesn't say why you should do this, but I would guess that this allows you to coat the shredded beets evenly and without flour clumps.
3. Melt 1 TBS of butter in a frying pan, heat over a medium flame until foam begins to subside. Press beet mixture into the pan with a spatula, let cook for 8-10 minutes over medium heat until crisp. It's important that the beets cook through, so don't rush it. Shake it around in the pan every so often, it does have a soft sizzle as it cooks. In the meantime, mix sour cream and horseradish in a small bowl, with a little black pepper if you like.
4. To flip, use the inverted plate method, and let cook for another 8-10 minutes.
5. Remove the rösti from pan, cut into fourths, and top with a dollop of the sour cream mixture. The spiciness of the horseradish pairs deliciously with the sweetness of the beets, and the sour cream matches just as perfectly as it does with a latke. Serve at room temperature.
Tuesday, July 15, 2008
Beet Time!
Friday, May 04, 2007
Year-Round Summer Berry Cobbler

My neighbor had a barbecue the other night, and I was charged with bringing dessert. I wanted to do something summery/barbecue-y and not too heavy, and thought a berry cobbler paired with french vanilla ice cream would work nicely.
This recipe from America's Test Kitchen/Cook's Illustrated (free registration required, but it's worth it) uses frozen blueberries. I had a couple bags of mixed berries in the freezer - they're cheap at Trader Joe's and I use them a lot for smoothies - and the combination of blueberries, raspberries, blackberries and strawberries worked perfectly well.
The trick to using frozen is to collect the juice that's exuded as the berries thaw and boil it down into a syrup before cooking, so the berry filling isn't too watery. You could probably get away with skipping that step - after all, there's no bottom crust to worry about sogging through in a cobbler - but you'll have to watch more closely for bubble over. And of course, you could always use fresh berries and not have to deal with the juices at all.
I did my best to speed up the thawing process by spreading the berries out on a cookie sheet in a warm oven (175°F, the lowest my oven will go) for about 30 minutes, and pouring off the juice every 10 minutes. That was the most annoying part of the preparation, so if you have time to let the berries thaw themselves in a colander, it's probably best to do that.
I also didn't have any buttermilk on hand, so I just substituted non-fat vanilla yogurt (full-fat yogurt or sour cream would have worked even better) in for the biscuit topping. The biscuit was a tiny bit dry as a result, but it was an acceptable substitution... I might also have overmixed the dough, which wouldn't have helped.
Last little tip - put a cookie sheet under the pan while baking, just in case. I got a little bit of bubble over despite having reduced the juices a lot.
The finished product was very tasty; the flavors of the berries were highlighted by just a little cinnamon, salt, and VERY fresh lemon zest and juice (from the neighbor's tree... yet another reason I love living in California!) and the biscuit topping held up well to the berry filling. It was more work than I thought it would be to reduce the juices, and this recipe was definitely not the 'quick and easy dessert' I had sort of hoped it would be. I'd suggest to wait for fresh berries and save the thawing/juice reducing steps, but if you're craving a summery treat in the dead of winter, it might be worth the effort.
Wednesday, May 02, 2007
What the hell do I do with fava beans?

image courtesy epicurious.com*
As it turns out, I make a salad. A quite delightful one, at that.
In our first week with the CSA, we got a delivery that included all the vegetable ingredients for this salad - asparagus, fava beans, and salad greens. We didn't have the pecorino cheese that the recipe called for, but I made do with a hunk of parmigiano reggiano. The salad itself was pretty simple - the veggies were tossed in olive oil with a little salt and pepper (is there anything in the world that isn't delicious with just EVOO, salt and pepper?), cheese shaved on top, and doused liberally with balsamic vinegar - but it was light, flavorful, and unexpectedly filling. Definitely a thumbs up.
I'd never encountered fava beans before, and after reading up on how to prepare them I thought it would be a pain - most recipes require you to shell the beans, steam or blanch the beans, and then peel off the outside layer to get the good stuff inside. And, okay, it *is* kind of a pain, but my husband and I were already sitting in front of the TV watching the Red Sox game, so it's not like we had anything better to do than shell and peel fava beans. It went quickly between the two of us, anyway.
I was also a little wary of the raw asparagus in the salad, but boy was I wrong. It was fabulous! I don't know if it was the raw-ness (the tips were blanched, but that was it) or their farm fresh-ness, but it was definitely the best asparagus I've had in a long time. Maybe even ever.
All in all, tonight served to remind me exactly what I love about being part of a CSA: discovering new recipes through having to cook with foods I'd never grab in the supermarket, and the joy of getting those foods super fresh and at peak season (I didn't even mention the fantastic strawberries and CHERRIES!). Plus I get to feel all self-righteous about supporting the local economy and sustainable organic agriculture! Hee.
Next up: What to do with a couple pounds of sugar snap peas?
*my photo skills just can't compare... and our salad was much bigger and messier, anyway!
Sunday, April 15, 2007
Pink lentil and bulgur pilaf with zucchini

I first tried out this recipe when I was living in a co-op here in Berkeley (in my first semester of grad school). We always had lots of whole grains and beans on hand, and were also always trying to come up with recipes that were suitable for the vegetarian/vegan members of the co-op. This one, probably adapted from the Moosewood Cookbook (?) was so good I had to write it down. :)
The finished result isn't the most beautiful-looking thing in the world, but it is really satisfying and has a rich flavor, even though it's pretty darn healthy. To wit: I made it tonight and my husband asked me how much parmesan cheese I'd put into it! I think he was fooled by the creaminess of the dish; the lentils kinda fall apart while cooking and make it seem like there must be cream or cheese or dairy of some kind in there. The bulgur maintains enough of its grain to give it a nice texture. Cooking the "pilaf" in chicken (or veggie) broth also gives it extra body. The zucchini contributes a mild flavor, and some nice green color.
This dish goes really well with fish or lemon-pepper chicken (due to the lemon in it), but it has enough protein from the lentils to be eaten as a vegetarian main dish.
The recipe (and nutrition info!):
-----
4 c. chicken or vegetable broth
1 c. bulgur
1 c. lentils
1 onion, diced
1 bay leaf
1 tsp. kosher salt
1/2 tsp. allspice
1/4 tsp. (several grinds) fresh black pepper
juice of 1 lemon (~1 Tbsp.)
-----
1 Tbsp. extra virgin olive oil
1 large zucchini (or 1 each medium zucchini and yellow summer squash)
1 clove garlic, minced
zest of one lemon (~1 tsp.)
~1 Tbsp each parsley and cilantro
Combine all ingredients in first group (except lemon juice) in a medium saucepan and bring to a boil over medium heat. Reduce heat to low and cook ~35 minutes, or until all the liquid is absorbed, creating your "pilaf". Stir in lemon juice. NB: there's really no way to retrieve the bay leaf from the pilaf, so look out for it when serving!
While the pilaf is cooking, chop up garlic and zucchini. Heat oil in skillet over medium heat. Add ingredients in second group (except parsley and cilantro) to the skillet with a pinch of kosher salt and saute 5 minutes. Stir sauteed zucchini into the cooked pilaf. Serve topped with parsley and cilantro.
Makes 6-8 servings.
Full nutrition info HERE (at NutritionData.com).
Thursday, March 15, 2007
Taco Soup
I love eating a nice hot bowl of soup or chili when it's cold outside but I'd never made it myself before.
I found this recipe for Taco Soup on The Food Network's web site.
Ingredients:
2 pounds ground beef (I used about 1.5 lbs ground turkey instead and it worked out well)
2 cups diced onions
2 (15 1/2-ounce) cans pinto beans
1 (15 1/2-ounce) can pink kidney beans
1 (15 1/4-ounce) can whole kernel corn, drained
1 (14 1/2-ounce) can Mexican-style stewed tomatoes
1 (14 1/2-ounce) can diced tomatoes
1 (14 1/2-ounce) can tomatoes with chiles (I used Ro*Tel)
2 (4 1/2-ounce) cans diced green chiles
1 (4.6-ounce) can black olives, drained and sliced, optional
1/2 cup green olives, sliced, optional
1 (1 1/4-ounce) package taco seasoning mix
1 (1-ounce) package ranch salad dressing mix
Corn chips, for serving
Sour cream, for garnish
Grated cheese, for garnish
Chopped green onions, for garnish
Pickled jalapenos, for garnish
To make the soup:
-Brown the meat and onions in a large skillet. Ground beef will yield it's own oils and fats for cooking but if you are using turkey as I did, you'll want to add some oil to the pan.
-drain the excess fat, then transfer the browned beef and onions to a large slow cooker or a stockpot. I don't have a slow cooker so I cooked mine in a big stockpot on the stove.
-Add the beans, corn, tomatoes, green chiles, black olives, green olives, taco seasoning, and ranch dressing mix, and cook in a slow cooker on low for 6 to 8 hours or simmer over low heat for about 1 hour in a pot on the stove.
-To serve, place a few corn chips in each bowl and ladle soup over them. Top with sour cream, cheese, green onions and jalapenos.
This makes what I would best describe as a Mexican chili. It's got the thickness of a chili and the meat and beans made me feel like I was eating chili, especially since I topped it with my favorite chili toppings: cheddar and sour cream. The choice of beans, corn, and spices give it a taco-like taste though. The corn chips on the bottom of the bowl were the best part of the soup. It added a great flavor to the soup. It was delicious.
This makes a HUGE amount of soup. I wouldn't necessarily recommend making less though because most of the ingredients are a whole can. Unless you are making another recipe soon using all the same ingredients, it's not worth it to waste the food. It does freeze well though. I ended up freezing quite a bit of it and eating it over the next few weeks.
Sunday, March 11, 2007
Emeril's eggplant and sweet sausage bake

About a month ago I resolved to clean out my freezer a bit. I have a tendency to buy meats when they are on sale, stick them in my freezer, and then forget about them. I found both sweet and hot italian sausage in my freezer and decided to try out some new recipes with them.
I did a quick search on foodnetwork.com (which, by the way, I am completely addicted to. I think I check it 4 times a day just to search for new and interesting recipes to try) and found this recipe for Eggplant and Sweet Sausage bake. I don't usually like to make casseroles but I do love eggplant, so I figured I'd give it a try.
Ingredients:
1/4 cup olive oil
1/2 pound sweet Italian sausage, removed from the casing
1 medium eggplant peeled and cut into 1-inch cubes (about 1 pound)
1 1/2 teaspoons salt
1/2 teaspoon cayenne
1/4 teaspoon freshly ground black pepper
1 cup chopped onions
1/4 cup chopped bell peppers
1/4 cup chopped celery
1/2 teaspoon dried thyme
1/2 teaspoon dried oregano
2 tablespoons minced garlic
2 cups chicken stock
2 tablespoons chopped parsley leaves
1 cup fine dried bread crumbs
1/2 cup grated Parmesan
To make the casserole:
-Preheat the oven to 375 degrees F.
-Heat the olive oil in a large skillet over medium-high heat.
-Add the sausage and cook until brown.
-Add the eggplant, salt, cayenne, and black pepper. Saute for 2 to 3 minutes, or until slightly soft.
-Add the onions, bell peppers, and celery and saute for 2 to 3 minutes, or until slightly wilted.
-Add the thyme, oregano, and garlic. Stir and cook for about 1 minute.
-Add the chicken stock and parsley and cook for about 3 minutes, stirring.
-Remove from the heat and add the bread crumbs and cheese. Mix well.
-Spoon into a casserole dish and bake for about 45 minutes, or until bubbly and golden brown.
I'm always trying to make recipes a little more healthful so I used less oil than it called for. Since I was using pork sausage, I got a fair amount of fat from that. Eggplant sucks up oil though, so I did have to add some oil. I only added as much as was needed though.
This turned out to be a very tasty casserole but it was a bit too spicy for my taste. I like things a little spicy, but this was too much for me. My spicy-food-loving boyfriend was crazy about it though. I think next time I'll either use hot sausage or only use 1/4 tsp cayenne.
It's not the prettist dish (as you can see from the photos) but it was rather yummy. I'll definitely be making it again in the future.
Monday, February 12, 2007
Dark greens with chickpeas and couscous

I adapted this recipe from (yet again) something in the most recent issue of Real Simple. It's healthy, tasty, and best of all, takes maybe 10 minutes to make and only uses two dishes (one pan and a bowl). Sign me up!
Start out by making the couscous. This could hardly be easier - measure 1 c. of couscous into a glass bowl, boil 2 c. of water and then pour it over the couscous (that will make 4-6 servings worth). This needs to sit for about 10 minutes, so while it's cooking, you can make the actual dish.
Finely chop two cloves of garlic. Prepare your greens: two bunches of swiss chard, or collards, or kale, or whatever dark green you want. I had bought a bag of mixed "southern greens" from Trader Joe's, which was enormous. You can vary the amount of greens you put in, but go with more than you think - these cook down a LOT, so make sure you have enough that you have to cook it in two batches. :) Finally, drain a 15oz can of chickpeas.
Heat up 2-3 Tbsp. of olive oil over medium heat in a saute pan. Once the oil is hot, add your garlic and cook for about 1 minute. Once the garlic starts to brown, quickly add the chickpeas and as much of the greens as will fit in the pan, and stir it around a bit. You don't want to burn the garlic, so it's key to have the rest of the ingredients at hand The greens will cook faster if you cover the pan, but it's not absolutely necessary. Add 1/2 c. raisins (these really make the dish) and the rest of the greens. Once all the greens have cooked down, stir in 1/2 c. chopped almonds (the RS recipe calls for pine nuts, but I'm a grad student and pine nuts tend to be expensive. So, I use almonds. Sunflower seeds would be another good substitution.) And of course, salt and freshly ground pepper to taste.
By now, the couscous should have absorbed all the water and formed itself into a more or less solid brick. Use a fork to scrape it out all nice and fluffy like, and serve with the greens. If you don't want to do couscous, quinoa or even brown rice would work equally well.
Slightly off topic: I made the brownies from Kris's last post this weekend - using dark chocolate rather than milk - and they are positively sinful. Mmm.
Thursday, February 08, 2007
Mmm...chocolate!!!
Okay, so it's winter, and nobody likes to go out. What to do, what to do? I have a solution! Make these delicious Milk Chocolate Brownies, from the Feb 2007 issue of Gourmet
1 stick (1/2 cup) unsalted butter
8 oz fine-quality milk chocolate, chopped
3/4 cup packed light brown sugar
1 teaspoon pure vanilla extract
2 large eggs
3/4 cup all-purpose flour
1 tablespoon unsweetened cocoa powder
1/2 teaspoon salt
1/4 teaspoon baking powder
Put oven rack in middle position and preheat oven to 350°F. Butter and flour a 9-inch square baking pan.
Melt butter and half of chocolate in a 1 1/2-quart heavy saucepan over low heat, stirring, until smooth. Remove from heat and cool to lukewarm. Stir in brown sugar and vanilla. Add eggs 1 at a time, beating well after each addition, until mixture is glossy and smooth.
Whisk together remaining ingredients, then stir into chocolate mixture. Stir in remaining chocolate.
Spread batter in pan and bake until a wooden pick or skewer comes out with a few moist crumbs adhering, 25 to 30 minutes.
Makes 16 brownies.
I used Ghiradelli milk chocolate, bought at Trader Joes in a big chunk. I got to use my kitchen scale to measure the 8oz of chocolate, and took great pleasure in taking out exactly half--yes, I am a geek! But one with good brownies!
I baked them for 25 minutes--the top got very crispy, but the inside was quite gooey--I did not, however, move the oven rack down to the middle position. So perhaps the top will get less done looking if you do so. However, my roommate and I are not picky about how done brownies are, and gooey is always good, so we were happy. I didn't skewer them to check for doneness (I thought one wasn't supposed to do that with brownies anyway?) but all was well. I highly recommend them to anyone!
Wednesday, January 24, 2007
Spaghetti with Clams

Ingredients:
In a large pot, bring to a boil 6 quarts of salted water. Add pasta, stirring constantly in the beginning to prevent it from sticking together. Cook until al dente, about 8 minutes.
Add 2 tablespoons chopped parsley. Whisk in butter to thicken sauce slightly.
Thursday, January 04, 2007
Mom mom's Snickerdoodles

To prepare the cookies:
In a large bowl, mix together:
1 cup soft shortening (part butter)
1 1/2 cup sugar
2 eggs
In a smaller bowl, mix together:
2 3/4 cup gold medal flour
2 tsp cream of tartar
1 tsp baking soda
1/4 tsp salt
Add the dry ingredients to the wet ingredients a little at a time and mix together.
At this point you can either chill the dough or get right to baking the cookies. My grandmother preferred to chill them. It will make it easier to roll the dough into balls without it getting sticky.
Roll the dough into balls the size of a small walnut (about one inch) and roll in the following mixture:
2 tbsp sugar (I found another recipe on the Betty Crocker website for Holiday Snickerdoodles HERE. I experimented making green ones which can be seen in the photo. However, you could use any color sugar to tailor the cookies to any occasion.)
2 tsp cinnamon
Place the dough on an ungreased baking sheet about two inches apart.
Bake at 400 degrees until slightly brown but still soft (about 8-10 minutes). They will probably be done before they look done. I made the mistake of over-cooking my first batch. They will puff up at first and then flatten out.
This recipe makes about 5-6 dozen cookies. Enjoy!
Thursday, December 21, 2006
The Usefulness of Rachael Ray, and other Snowbound Thoughts
Okay, so I'm moving this weekend and I just got hit by Denver's "Blizzard of 2006." This creates two (culinary) problems: All my dishes are packed and all my food is at it's bare minimum, and I can't go out and buy anything as all the supermarkets have been closed down.
Last night we had a little less than a half chicken breast and some assorted foods, and we wanted to make some warm soup to get through the night. We really didn't have enough broth, but we have a fridge full of wine from a going-away party earlier in the week, so I thought I could make a tasty liquid. As I'm cooking I realize that I have a can of crushed tomatoes, and I realized that I'm saved. Yes, saved.
While watching her show makes me want to die, Rachael Ray usually has some recipes that can be easily changed to fit your situation so that you, too, can have a tasty meal with some pantry staples (and really, we're down to just the pantry duct tape at this point!).
So, one of our favorite Rachael Ray recipes is her *sigh* Italian Sub Stoup. We had recently altered the recipe to make an Italian sausage stoup for an appetizer party, so I decided to save the day and make a delicious concoction that I probably wouldn't have thought of without her.
I took the 3/4 of a box of broth, juice-box sized box of stock, some leftover wine, and the crushed tomatoes to create a hearty base. I then added some cooked chicken, two carrots, garlic, half an onion, and bit of green pepper to create a "stoup." We added the last of our croutons and parmesan cheese and had a delightful and healthy meal (when our alternative was about 1000 crackers). It's not so much Rachael Ray's exact recipes, but really her methods that will come in handy in a pinch.
But please, do yourself a favor and DON'T watch her talk show.
Wednesday, December 20, 2006
Butternut "bruschetta" on sourdough toasts

I'd suggest to start by peeling and chopping all the ingredients, as this is the most time consuming part of the recipe. I used:
4 c. butternut squash (about half of a large squash), peeled and finely diced
4-5 strips (soy) bacon, also diced
1 c. firm apple (about one Granny Smith or similar), diced. Toss with a little lemon juice to keep from browning.
2-3 Tbsp. good quality maple syrup
4-5 leaves fresh sage, crushed
1/2+ tsp. chili powder (adjust to taste)
1/2 tsp. salt
a few grinds fresh black pepper
1 large sourdough baguette (or 2 small), sliced into 1/4-1/2 inch thick pieces and toasted under the broiler
If you choose to use real bacon, start off by cooking this over medium heat in a large saucepan, until the pieces have crisped - this should happen pretty quickly. [If you use the fake bacon, skip this step and instead heat up 1-2 Tbsp. olive oil in the pan] Add the butternut squash, maple syrup, spices (sage through pepper) and sautee with occasional stirring until the squash has softened, about 10 minutes. Add the chopped soy bacon at this point. Cook another 5 minutes.
Remove from heat and mix in the apple - I left it mostly raw so it would give a nice crunch (to contrast the 'mushiness' of the squash). Spoon ~1 Tbsp. or so onto each toasted slice of sourdough and arrange on a plate. These taste best warm or at room temperature.
Sunday, December 17, 2006
Cranberry-ginger and orange pinwheels

These are the cookies that I made for the cookie swap I hosted this evening (it went smashingly). They turned out very well, but I'm not sure I'd make them again - I always find the rolling and cutting process pretty tedious!
Dough:
1/2 c. butter
1 1/2 c. sugar
1 tsp. orange rind
2 eggs
1/4+ tsp. cinnamon
1/4+ tsp. nutmeg
3 c. flour
1/2 tsp. baking powder
1/2 tsp. salt
Filling:
1 c. cranberries
1 c. pecans
4 medallions of candied ginger, chopped finely
1/4 c. brown sugar
Cream together the butter and the sugar until it becomes very light in color (signifying that it has become aerated), about 5 minutes. Add the orange rind and eggs (one at a time please!), then the spices, baking powder and salt. Mix until very well combined. Blend in the flour a cup at a time - if you have a stand mixer, it will probably be able to handle this fine, but if you're using a hand mixer you may need to get in there with your hands to combine the last half cup or so. Divide the dough into two portions and put it in the fridge for at least an hour (we chilled ours overnight).
While the dough is chilling, prepare the filling (hey, that rhymed!). If you have a food processor, just throw all the ingredients in there and process until it's all chopped up. If not, mix everything together in a bowl and use your blender to do it in two or three batches.
Roll out one half of the dough into a 1/4" thick rectangle (about 10"-12" on the long side) on top of a piece of parchment paper or a flexible cutting board. Spread half of the filling on the dough, leaving an inch of dough on each long side and one of the short sides. Then, using the parchment paper, roll up the dough starting at the spread short side. Pinch off the ends and roll the dough in a sheet of plastic wrap, then pop it back in the oven, this time for at least four hours (!)
Once the dough has chilled - it should be super firm at this point - use a sharp knife to slice into 1/4" cookies. You should try to rotate the roll after every few cuts so you don't smush it on one side. Bake 8-15 minutes (depending on thickness) at 375°F.
And just for fun, here's the rest of the spread, post-party:
Dee-lish!
Thursday, December 14, 2006
Turkey pot pie

I know it's a little late to be talking about Thanksgiving leftovers, but maybe some of you still have as much turkey meat in your freezer as we do! In my humble opinion, there are few better uses for pre-cooked poultry than this pot pie. My husband and I often make this with chicken when we've roasted a whole bird and have a lot of leftover meat.
The recipe is based on this one from Good Eats (yes, we are Alton Brown junkies) but we do it rather differently than AB. The two things that make this pot pie superior are: 1) the curry in the sauce - the flavor is not obvious but it really gives it that special something; and 2) the small number of pots and pans required to make the dish.
Ingredients:
3 Tbsp. butter
1 c. diced onion
1 c. chopped celery
2 c. chopped carrots (can substitute frozen peas for some of this, if you like, or just add up to 1/2 c.)
1 large potato, peeled and diced smallish
1 1/2 c. turkey/chicken broth or stock (which you will, of course, have made from your turkey carcass)
1/2 c. milk
3 Tbsp. flour
1 tsp curry powder
1 tsp. salt
1/2 tsp. fresh ground pepper
2 c. cubed or shredded cooked chicken
1 package Grands biscuit dough (you can make your own dough, of course, but I'm lazy).
Directions:
Melt 1 Tbsp of butter in a large saute pan over low heat. Sweat the onion and celery for about 5 minutes, until the onion becomes translucent. Add the other veggies (make sure you cut them fairly small so they'll cook quickly), turn the heat up to medium, and cook another 10 minutes. Meanwhile, heat the broth and milk together in a small saucepan (you could also do this right in a measuring cup in the microwave, on low-medium heat).
Back to the veggie pan: Scrape the veggies to the edges as best as you can and add the remaining butter. Whisk the flour and curry powder with the melted butter and let that cook for a couple minutes (this makes a sort of roux to thicken the sauce, and eliminates the flour-y taste). Whisk in the hot milk mixture and cook until thickened. Add the salt, pepper, and cooked chicken, and stir thoroughly. Place the Grands biscuits on top (one package contains six, which makes a perfect daisy in our 12" pan) and pop the whole thing into a 400°F oven (if your pan is not oven safe, you can of course transfer the filling to a casserole dish, top with the biscuits, and bake in that instead). Bake about 25 minutes, or until the biscuits are golden brown on top and the filling is bubbling up between them. Yum!
Wednesday, December 13, 2006
Buffalo Chicken Salad
Some nights I just don't feel like cooking. When it's been a long day all I want to do is throw together a quick meal and watch some TV.
I still want to eat something healthful and fresh on these nights though, so I've been experimenting with ways to make a simple salad more exciting.
The best thing I've come up with is my buffalo chicken salad.
With the help of my George Foreman grill, this takes about 5 minutes to throw together.
The George Foreman grill is great for quick and easy cooking. You could also broil or bake, but it takes much longer for things to cook that way and you also have to wait for the oven to heat up.
I take a chicken breast and cut it into thin slices so they will cook faster. I give them a quick coat of buffalo sauce and then put them on the George Foreman for about 3 minutes or until they are done. I also pour some buffalo sauce onto the chicken pieces on the grill. Marinating them for a bit would work as well, but it's not necessary.
While that is cooking, I assemble the salad. I usually just use lettuce (I use the pre-cut bags of lettuce) and tomatoes but any veggies would go well.
Once the chicken is done I cut it up and add it to my salad. Add a little more buffalo sauce if you'd like and then a little ranch or blue cheese dressing.
It's delicious :)
I've found that Frank's Buffalo Sauce is the best. It's the perfect amount of spicy and still has tons of flavor. I also like to use Marie's blue cheese dressing because it's the BEST. I've been eating the lite kind and it's pretty tasty.
Monday, December 11, 2006
Caramels
Around the holidays, my family always made these caramels. The recipe was originally from my grandparents' best friends, and I grew up thinking that it was a super secret family recipe. Last year we discovered an almost identical recipe in Shirley Corriher's excellent book Cookwise. Go figure.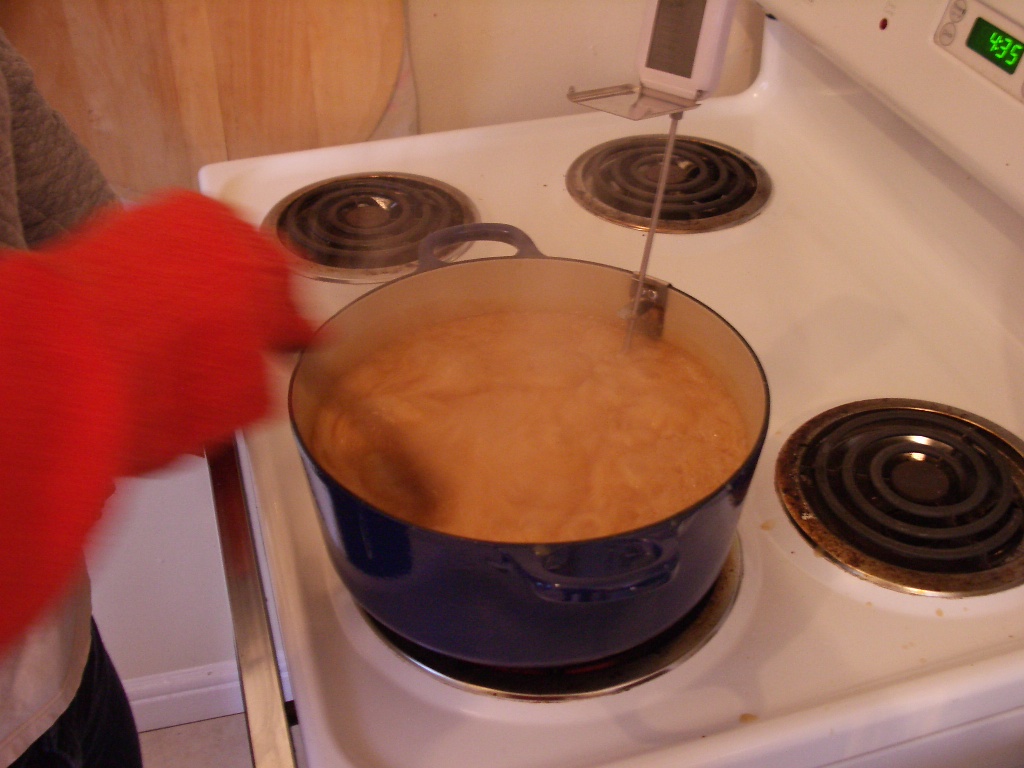 Candymaking can be tricky, but it's within reach if you have the right tools and a few important bits of knowledge. A trustworthy candy thermometer is key, since a few degrees in either direction can make the difference between hard candy and a nice soft caramel. A very solid pot (for even heat distribution) will make your life much easier, although my dad usually did okay with a nasty old aluminum pot.
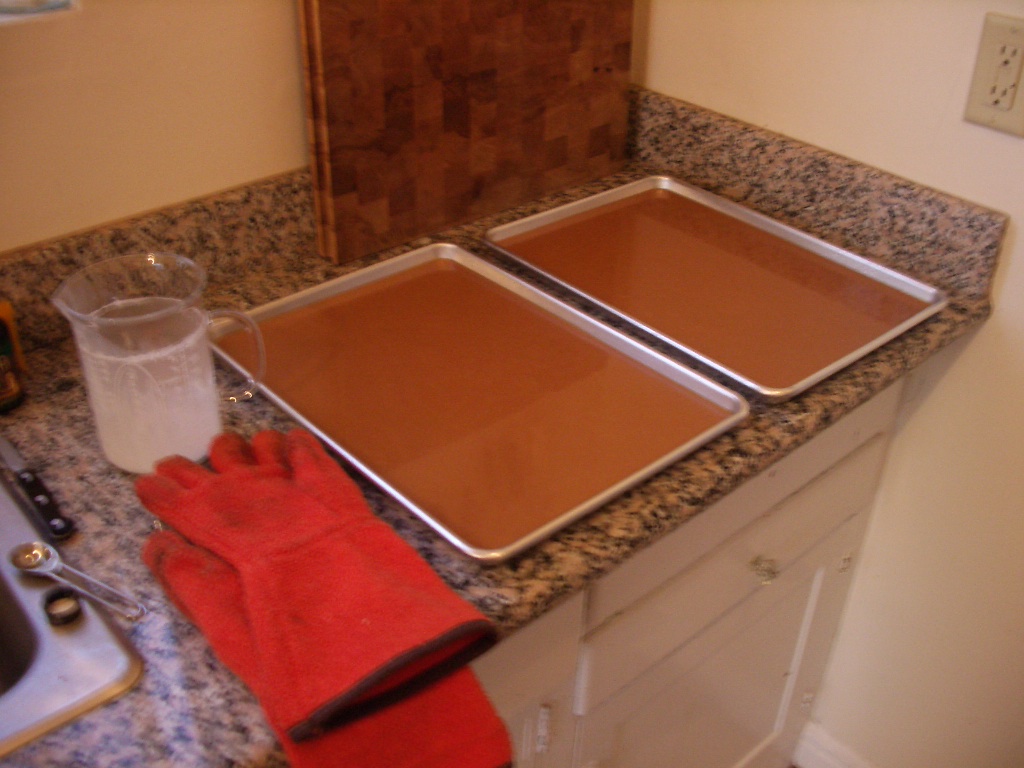 Start by buttering up a sheet pan (so you don't have to do it later). Then, melt 2 cups of granulated sugar and 2 cups of light corn syrup on medium heat. The corn syrup helps keep the granulated sugar from recrystallizing once it's melted and prevents the candy from becoming grainy. You can stir a bit at the beginning, but not once the sugar has started melting (since again, that might cause recrystallization). You also don't want too much sugar on the sides of the pot - to avoid this, put the lid on when the sugar starts steaming, and let the steam collect and run down the sides. Once the sides are clear, take the lid off and put in your thermometer. Keep the sugars on medium heat until they reach 310°F/154°C - this will take a while, but keep an eye on it from about 270° on.
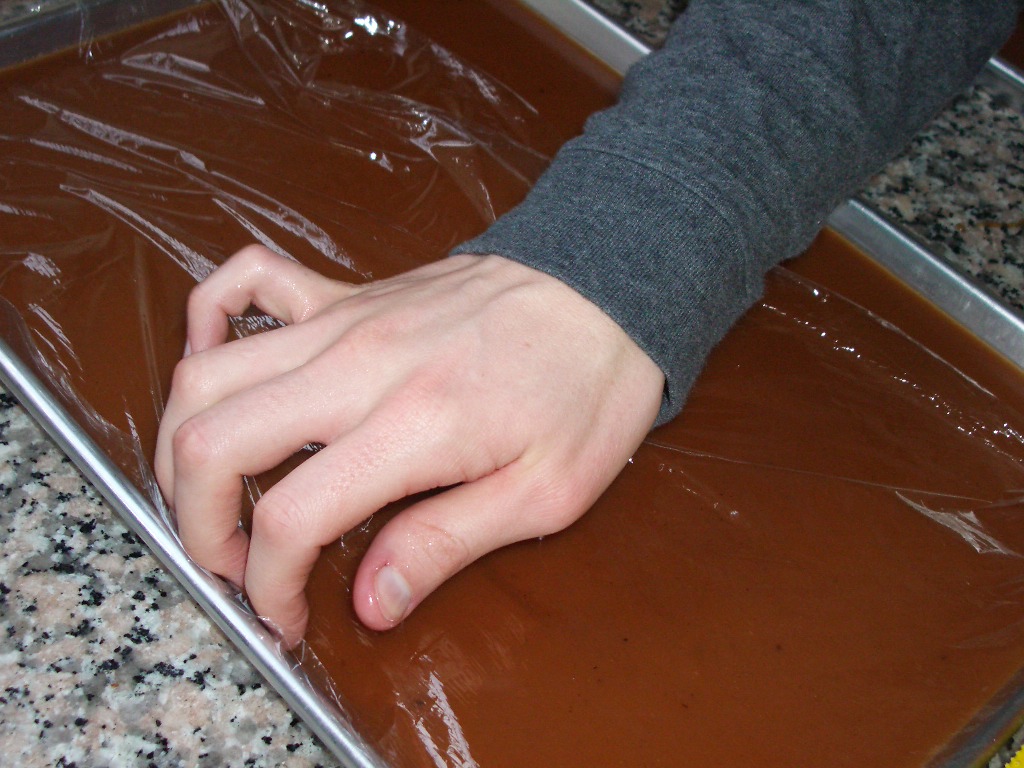 While the sugar has started melting, cut 1/2 c. of butter (1 stick) into 1 Tbsp. chunks and measure out 2 c. heavy whipping cream. Once the sugar has reached 310°F, stir in the butter chunks and cream sloooowly. The temperature will drop pretty rapidly. Stir constantly (scraping the bottom and sides to fully incorporate the melted sugar) until the mixture reaches 245°F/118°C. Take the caramels off the heat and quickly stir in 1 tsp. vanilla extract (or vanilla paste). Then pour the caramel out into the buttered cookie sheet. Typically, the candy will already have started to cool by the time you're done pouring it out, so don't scrape out the sides (you might end up with a big lumpy mess on top of your nice glossy candy).
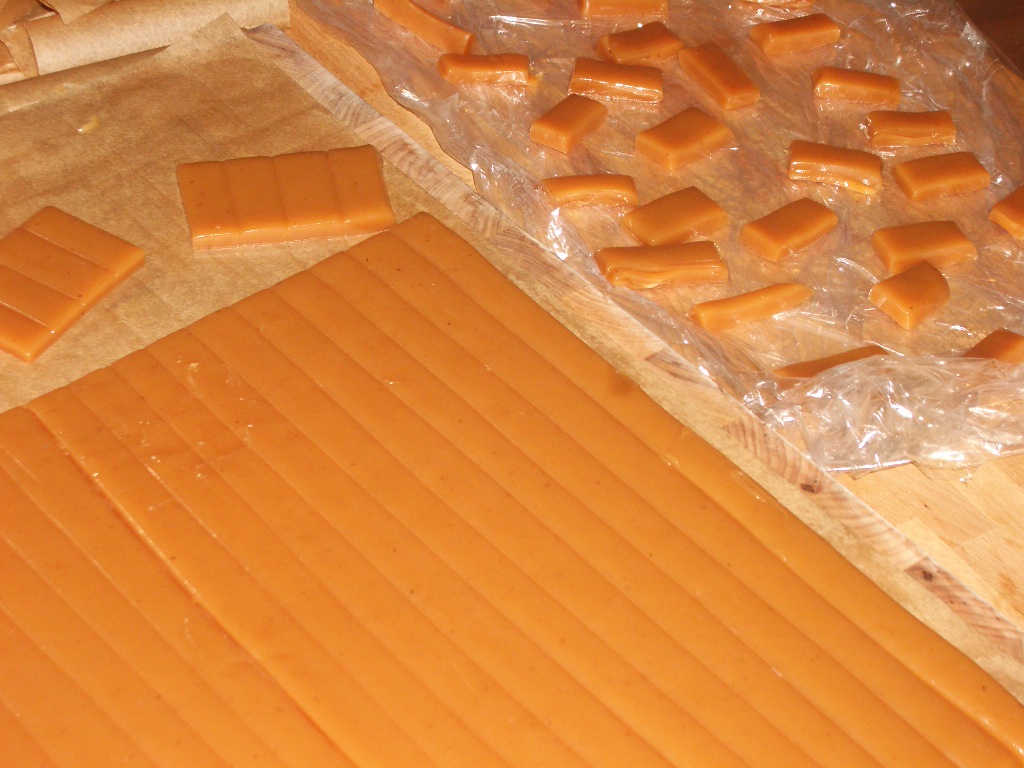 You will be tempted to lick the spoon/scrape the caramel out of the bottom of the pot right away, but trust me, you don't want to do this. It's still over 200°F and it will burn the hell out of your tongue. So, let it cool a little bit (or, my personal favorite - put a scoop of vanilla ice cream in the pot and eat it with the hardened caramel). Give the caramels 1-2 hours to harden a bit, then cover them with plastic wrap. This will prevent the caramels from absorbing excess moisture from the air and becoming too gooey. It's best to let the caramels harden for a few more hours (or overnight) before you cut them.
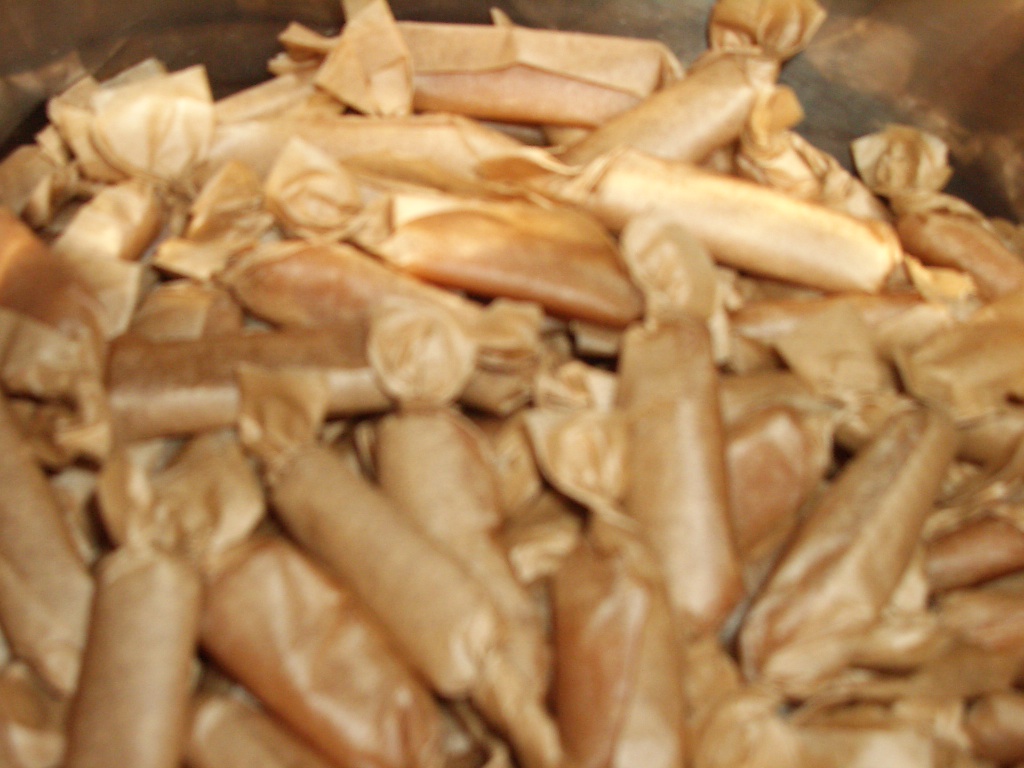 The easiest way to cut the caramels efficiently is to turn out the whole sheet of candy (pry it out from one end with a flexible spatula) onto a sheet of parchment paper. Then, use a pizza cutter to slice lengthwise into strips and then widthwise into chunks. Wrap in rectangles of parchment paper and enjoy!
Monday, November 13, 2006
Talking Turkey
Okay, so it's coming. One of the biggest eating holidays of the year. And the centerpiece is usually turkey. Turkey can be a tricky thing. It seems like you could cook birds of the same size for the same time and one will be dry, and the other raw. It can be tasty, but sometimes can be flavorless (a particular complaint of dry turkey). It seems confusing, no? Well, never fear, because here is a complete, easily adaptable, countless variations turkey recipe guaranteed to come out right every time. Unless your oven breaks, then I can't help you.
You will need:
A good quality roasting pan. I own this one , but any good heavy one will do.
A meat thermometer with an alert. There are lots of good ones out there.
A turkey of a size appropriate to your gathering, fresh and not frozen please!! My family gathering of 7 will happily cook a 20lb turkey, because sandwiches on Thanksgiving night is more required than tradition. All that lazing around makes you want leftovers!
Carrots, onions, and celery, 2 of each is good
chicken broth (or turkey broth, or veggie--whatever you like), 2 32oz. boxes or so.
Butter. Yes, it has to be butter. Trust me. I would recommend using a whole stick, because if you don't use the leftovers for gravy, it will taste amazing on bread.
Herbs of your choice, fresh or dried is not terribly important. These will be mixed with the butter.
About an hour before you cook, take the turkey out of the fridge. Wash it inside and out, pat it dry inside and out, and salt and pepper it. Place it on the roasting rack in the pan, and let it sit at RT for an hour. Use this hour to preheat the oven to 450. About 30' beforehand, soften some butter, and mix into the butter whatever herbs you'd like to flavor your bird with. I like using fresh thyme, or a mix of rosemary, thyme and garlic. If you are using fresh and NOT stuffing the turkey, place some sprigs of herb in the cavity. Carefully (VERY carefully) slide your hands in between the skin and breast of the bird, and loosen the skin. Generously rub the herb butter over the breast meat. Leaving pieces is OK, just don't shove chunks in and leave it. You want to get all the meat. This will take 4-6T of butter total, depending on bird size. Put a little butter on the skin of the bird if you like crispy skin; if not, leave it. Cut up your veggies, and scatter them in the roasting pan. Add enough broth just to cover the veggies; I would use about a box and a half of broth for my roasting pan, but once again, this is dependent on size.
Now, insert the meat thermometer into the thickest part of the thigh, but DON'T TOUCH THE BONE (that is so important--ask me how I know). Try going parallel to the bone. Guidlelines say that the bird is DONE when the leg reaches 185 degrees, so you want to set your thermometer to go off when the meat reaches 175 degrees. Yes, you heard correctly. We'll get to this.
By now your oven should be fully preheated. Open it, and slide the bird in. Make sure (before you do the sliding) that your only rack in there is in the bottom 1/3 of the oven. Cook at 450 for 30'. After 30', turn the oven down to 350, and cook until the temperature alarm goes off. As a time estimate, an unstuffed bird takes about 12-15' per pound, and a stuffed one takes 18-22' a pound. This is also dependent on your oven--my mom's pretty shiny new oven cooked the turkey an hour faster than predicted. So time is an estimate only! Do not open the oven to baste the bird--this only lets heat out and makes the skin soggy. Only open the oven for two reasons: 1) the pan is getting dry and you need to add more broth, or 2) the turkey is browning faster than you like, so you need to tent it with tinfoil. NO BASTING!!
Once you take the bird out, pick up the rack and move it to a plate. Turn the alarm feature off of the temperature probe, and cover the turkey with foil. The temp should continue to rise for the next 30' or so, thus ensuring the cook point of 185 degrees, but not making dry turkey!
Okay, you are now ignoring the turkey. Take the roasting pan, and pour the liquid inside into a measuring cup, or (even better) a fat separator. Let it sit for 5'. Melt some butter into a large saucepan (leftover herb butter, anyone?) and throw in some fat from the liquid in the measuring cup. Add enough flour to make a paste, and stir for 1' over medium heat. When it's thick enough, add the pan liquid (and extra chicken broth if needed/desired) into the pan. Stir or whisk for 1'. Bring to a boil, and boil until the gravy coats a spoon (meaning, it gets thick). If it's thicker than you like, just whisk in a little more broth.
When the gravy is how you want it, take it off the heat. Carve your bird as desired, and serve with the hot gravy. Oh so very good!!
Gravy variation which sound weird but is so very good:
Instead of making the butter/fat/flour roux, put some gingersnap cookie dough into the pan. Add a little broth and fat, and whisk till it's smooth. Add broth as desired. This works well with turkey seasoned with thyme and/or garlic.
Hearty Sausage and Pumpkin Soup
Continuing the pumpkin kick...
My boyfriend and I whipped up a hearty sausage and pumpkin soup last night, perfect for a rainy Sunday night. We just sort of threw things in the pot willy-nilly, and here's what ended up in there:
- 6 hot Italian sausages
- 1 onion, chopped
- 4 cloves of garlic, chopped
- 1/2 chipotle pepper with adobo sauce (chop up the pepper)
- 1 29-oz can of pure pumpkin
- 1 15-oz can of black beans
- 3 cups chicken stock
- 1/2 cup half-and-half
- salt & pepper
- cumin, to taste
- chili powder, to taste
- pinch of cinnamon
- Chipotle Tabasco sauce, to taste
- lime
Remove sausages from the casings, and cook in a large stockpot until browned. Add onions, garlic, and chipotle pepper with adobo sauce. Cook until onions are translucent, season the mixture with S&P, cumin, and chili powder.
Add pumpkin and black beans, mix with sausage before adding chicken stock. Add the cinnamon and more spices/Tabasco as you like, simmer for about 20 minutes. Stir in the half-and-half, serve when heated through. Finish with a squeeze of the lime over individual bowls.
This was especially delicious with hunks of home-made cornbread dropped into the soup. The high-fiber content makes the soup quite filling, so I would say that this makes 6 substantial portions.
Sunday, November 12, 2006
Pumpkin Zucchini Bread
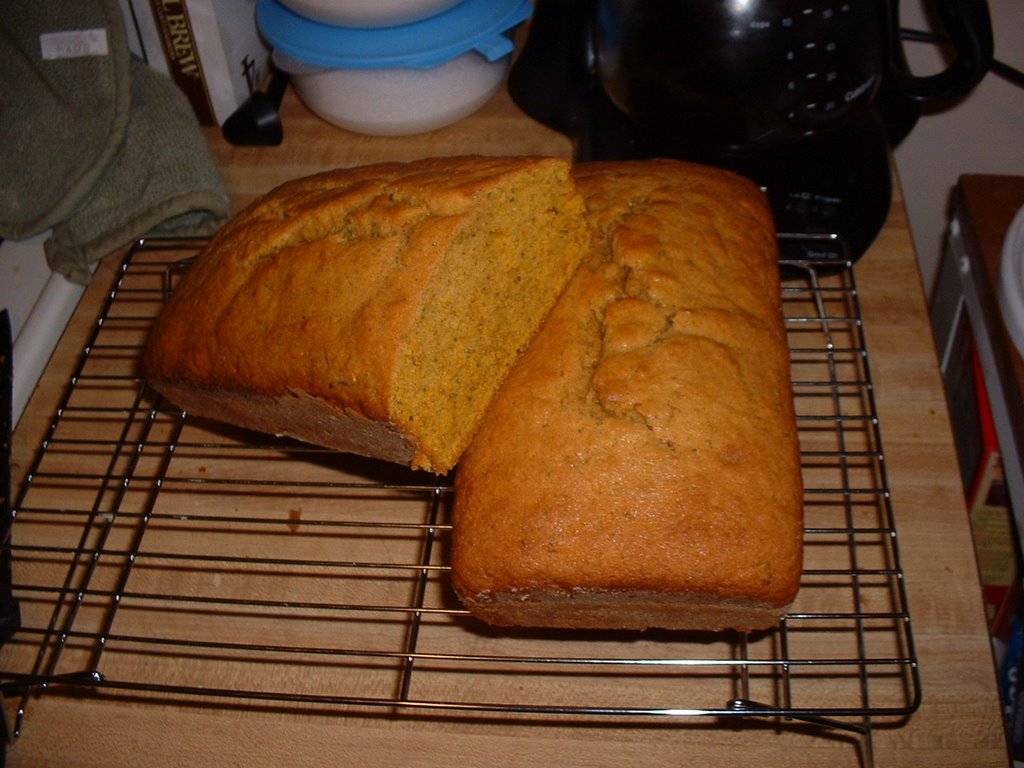
One of my favorite things about this time of the year is all the delicious desserts that can be made with pumpkin. I get excited for my aunt's home-made pumpkin pie a few months in advance of Thanksgiving.
I've never done any pumpkin baking before so I decided to give it a try. I figured an easy way to start would be this recipe of a variation on zucchini bread--something that I know to be fairly fool-proof.
I came upon this recipe in a "special bonus section" of a cooking magazine that I subscribe to, Taste of Home, which is published by Reiman Publications (http://www.reimanpub.com).
Ingredients:
-3 eggs, lightly beaten
-2 cups sugar
-1 cup canned pumpkin
-1 cup melted butter
-1 tbsp vanilla extract
-3 cups all-purpose flour
-1 tsp baking soda
-1/2 tsp baking powder
-1/2 tsp salt
-1/2 tsp ground cinnamon
-1/2 tsp ground nutmeg
-1/2 tsp ground cloves
-1 cup shredded zucchini
-1 cup chopped walnuts
The recipe called for canned pumpkin so that is what I used. I'm sure you could substitute with fresh pumpkin as well. After reading Jackie's post on how to break down a pumpkin I may use fresh next time.
When I shredded my zucchini I used a fairly fine sized grater. This resulted in loss of a lot of water which I removed from the zucchini before I added it to the batter. My bread turned out a little drier than I would have liked so I'd recommend letting some of the moisture from the zucchini go into the batter.
Making the bread:
-Preheat oven to 350 and grease and flour 2 9in x 5in x 3in loaf pans
-Combine eggs and sugar in a mixing bowl
-To this, add the other wet ingredients (pumpkin, butter, and vanilla)
-In a separate bowl, mix all dry ingredients (baking soda, baking powder, salt, cinnamon, nutmeg, cloves, zucchini)
-Gradually add the dry ingredients to the wet ingredients and mix well
-Mix in zucchini and walnuts
-Pour into the 2 pans and bake for 45-50 minutes or until a toothpick inserted into the loaves come out clean.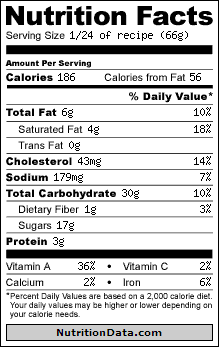 For my first test run, I followed the recipe exactly in terms of sugar and butter. I'd expect that it would turn out well using margarine and sugar substitute (such as the baking Splenda) as well. I'm thinking of making them again in the future with the margarine and Splenda.
I omitted the walnuts as I don't like walnuts.
This nutritional information is for 1/12 of one loaf made with butter and sugar and without walnuts.
The bread turned out great and was delicious! It made far more than my boyfriend and I could eat, so I kept one loaf for ourselves and brought one into lab for other people to snack on. We'd finished our loaf in about a week but I'd imagine that you could freeze one loaf or part of a loaf if it will be longer than that before it is finished.
Saturday, November 11, 2006
Curried pumpkin soup / how to break down a pumpkin

The pumpkin that we never got around to carving on Halloween needed to be dealt with. I originally wanted to break it down into chunks, but that wasn't going to work - the skin was impossible to peel and the shell was too hard to cut it into wedges and "peel" with a knife. I managed to crack it in half and scoop out the seeds,* then put both halves on a cookie sheet in a 450°F oven for about an hour (it was a big pumpkin). Once the flesh was fork tender, I took it out and let it cool.
* I set the seeds aside to dry, coated them in kosher salt, and then toasted them in the warm oven after the pumpkin itself was done baking. They make a great little snack... if you're feeling adventurous, try adding some other spices to the mix - paprika, curry powder, cayenne pepper or even just a little black pepper would be tasty.
When I went to go break it down, I discovered that it was pretty stringy - not surprising since it was so big. So I broke out the trusty food processor (you could use a blender to do this) and processed it in three or four batches. I ended up with a smooth, if watery, pureé, similar to what you would get out of a can.
So, what does one do with eight cups of pumpkin puree? Make a soup, of course. Pumpkin curries are one of my favorite Thai dishes, and I keep stumbling across really delicous-sounding recipes for pumpkin with curry (or curry-like flavors), so I decided to make an attempt at my own combination. I am happy to say that it came out really well. The pumpkin is pretty mild, but I think the flavor comes through the coconut milk and curry. The lime and cilantro add depth, but they aren't 100% essential.
This made a pretty big recipe (6-8 servings); you can certainly cut it in half.
Curried pumpkin soup
1/4 c. olive oil
2 onions, diced fine
1 tsp. salt
6 Tbsp. curry paste
1 Tbsp. grated fresh ginger (or 1 1/2 tsp. powdered)
2 c. (16 oz) vegetable broth
5 cups pumpkin puree (equivalent to about 2 x 15.5 oz cans)
1/4 c. brown sugar
1 x 13.5 oz can coconut milk (optionally - set aside 1 Tbsp or so to drizzle on top of each bowl)
(optional) lime juice, cilantro
Directions:
In a dutch oven or similarly large pan, warm olive oil over medium heat. Add the diced onions and salt and cook until onions are translucent, about 10 minutes (since there are so many of them). Add the curry paste and fresh ginger and stir well. Cook another 2 minutes, just to get the flavors all out of the curry paste. Add the vegetable broth, pumpkin puree, brown sugar and coconut milk and stir well. Bring to a boil, then simmer 10 minutes.
If you want a super smooth texture, run the soup through your food processor or blender 1-2 c. at a time (just don't fill your blender more than halfway full, or you may end up cleaning the soup off your ceiling). I decided that the texture of the onion pieces wouldn't bug me enough to justify breaking out the blender again, so I skipped this step.
Just prior to serving, squeeze the juice of 1/4 lime over each bowl; top with 1-2 tsp. chopped fresh cilantro.
---------
As for the rest of the pumpkin, it will probably get made into this Pumpkin Pecan Coffee Cake from Once Upon a Feast for breakfast tomorrow. :)
